Designer: BabyStarLine
Instagram: @babystarline
Ravelry Store: BabyStarLine
Looking for a new amigurumi to crochet? I’ve got you…
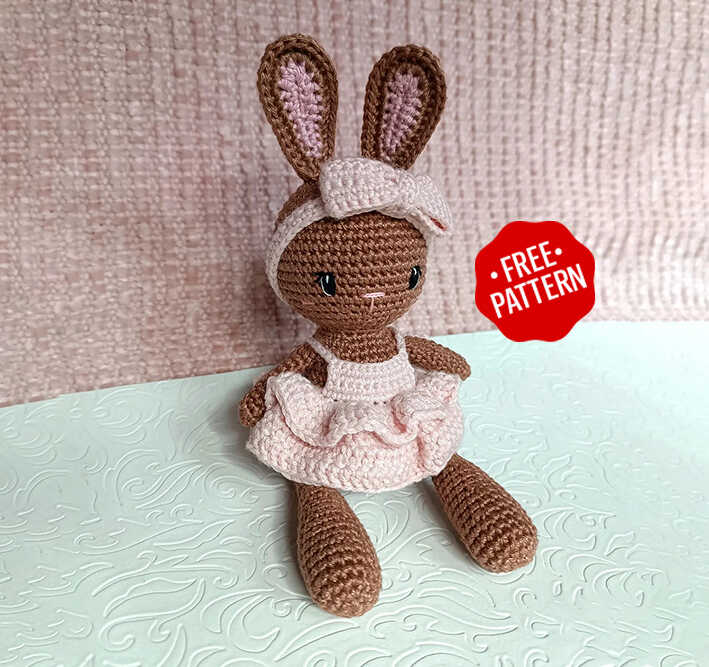
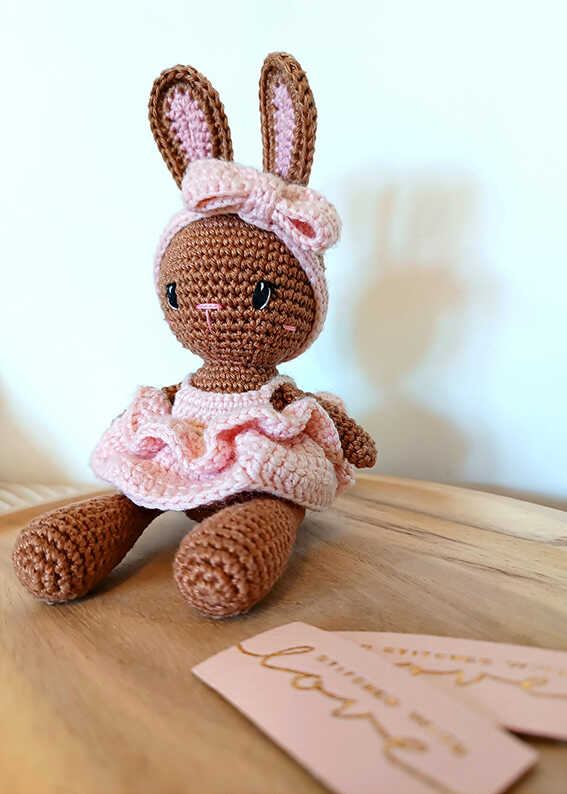
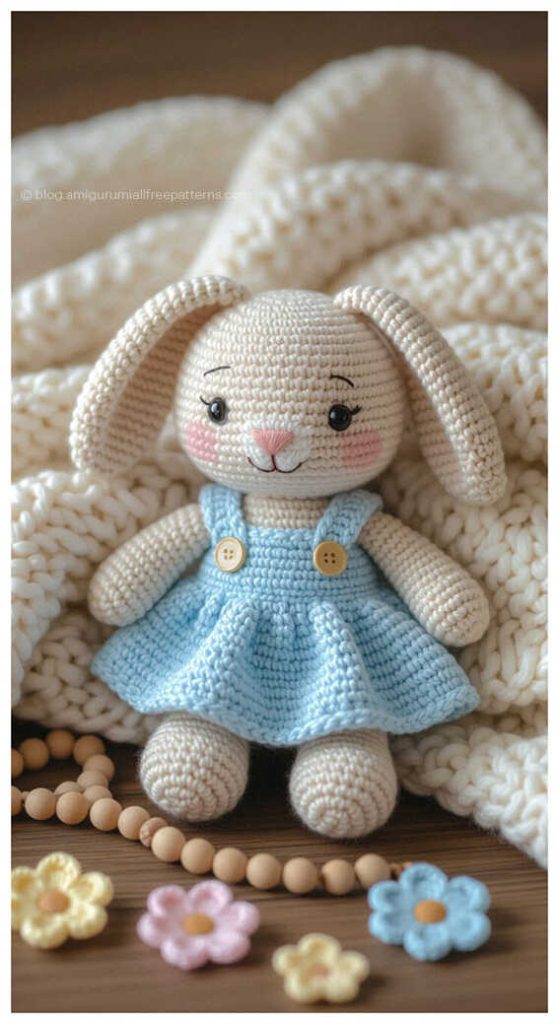
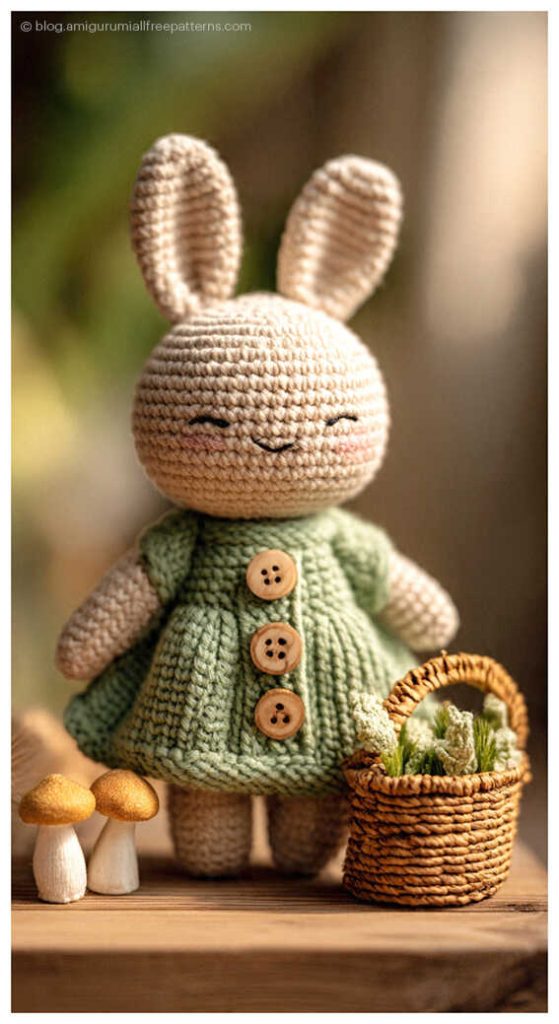
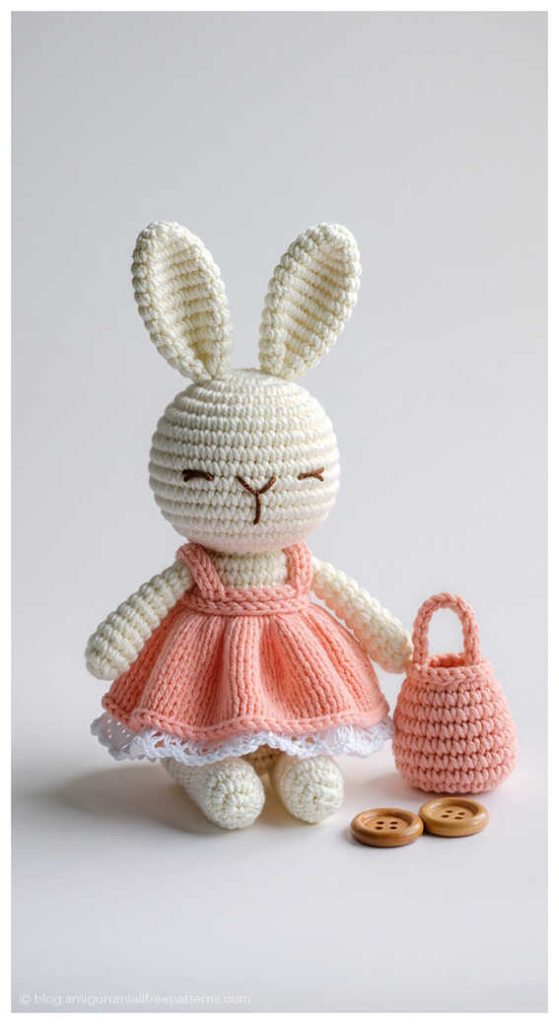
Bunny Amigurumi – Free Crochet Pattern Tutorial invites you to create a sweet and timeless handmade bunny with a soft, charming look. This step by step, beginner friendly guide gently walks you through the process using simple materials such as cotton or acrylic yarn in brown for the body and ears, light pink for the dress, bow, and inner ears, plus a touch of white for optional apron straps. Along the way, you’ll naturally work with a crochet hook, safety eyes, stuffing, and a sewing needle to bring all the details together neatly. At the end of the pattern, you’ll also find lovely amigurumi bunny ideas to inspire creative variations and styling options. Many thanks to designer Krisztina Szabo for sharing this beautiful bunny design.
Clear instructions and a calm, approachable flow make this tutorial ideal for crocheters who enjoy relaxed projects with a polished result. Each element is shaped with care, helping you achieve clean stitches and a well-balanced bunny form while keeping the process enjoyable and stress-free. Whether you’re making a thoughtful handmade gift or adding a new character to your amigurumi collection, this bunny project offers a delightful and rewarding crochet experience from start to finish.
Materials
– Yarn: Cotton or acrylic yarn in the following colors:
Brown (for the body, ears, and legs)
Light pink (for the dress, bow, and inner ears)
White (for the apron straps, optional)
– Crochet Hook
– Stuffing
– Safety Eyes
– Sewing Needle
Abbreviations
– ch: chain
– sl st: slip stitch
– sc: single crochet
– hdc: half double crochet
– dc: double crochet
– inc: increase
– dec: decrease
– FLO: front loop only
– BLO: back loop only
FREE BUNNY AMIGURUMI – CROCHET PATTERN INSTRUCTIONS
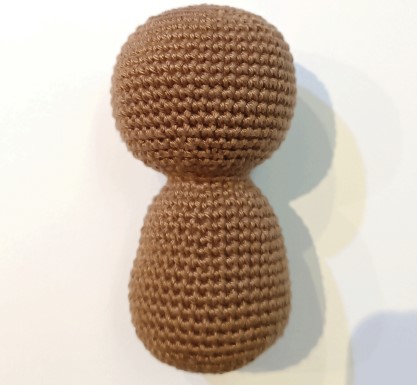
Head and Body
Round 1: 6 sc in magic ring (6)
Round 2: inc in each stitch (12)
Round 3: (1 sc, inc) repeat 6 times (18)
Round 4: (2 sc, inc) repeat 6 times (24)
Round 5: (3 sc, inc) repeat 6 times (30)
Round 6: (4 sc, inc) repeat 6 times (36)
Round 7: (5 sc, inc) repeat 6 times (42)
Round 8: (6 sc, inc) repeat 6 times (48)
Rounds 9-17: 48 sc (9 rounds)
Round 18: (6 sc, dec) repeat 6 times (42)
Round 19: (5 sc, dec) repeat 6 times (36)
Round 20: (4 sc, dec) repeat 6 times (30)
Round 21: (3 sc, dec) repeat 6 times (24)
– Start stuffing the head and continue as you go.
Round 22: (2 sc, dec) repeat 6 times (18)
Round 23: 18 sc
Round 24: (2 sc, inc) repeat 6 times (24)
Round 25: (3 sc, inc) repeat 6 times (30)
Rounds 26-27: 30 sc (2 rounds)
Round 28: (4 sc, inc) repeat 6 times (36)
Rounds 29-30: 36 sc (2 rounds)
Round 31: (5 sc, inc) repeat 6 times (42)
Rounds 32-38: 42 sc (7 rounds)
Round 39: (5 sc, dec) repeat 6 times (36)
Round 40: (4 sc, dec) repeat 6 times (30)
Round 41: (3 sc, dec) repeat 6 times (24)
Round 42: (2 sc, dec) repeat 6 times (18)
Round 43: (1 sc, dec) repeat 6 times (12)
– Finish stuffing the body.
Round 44: dec x6
– Close the round using a tapestry needle and weave in the ends.
Ears
– Make a total of 4 ears:
– 2 in the bunny’s main color
– 2 starting with pink, then switching to the main color
Solid Color Ears (Make 2)
1. Ch 9. Work around the chain.
2. Starting from the 2nd ch from the hook: sl st, 3 sc, 3 hdc, 5 hdc in last ch.
3. On the other side: 3 hdc, 3 sc, sl st (18)
4. Ch 3. Starting from the 2nd ch from the hook: 9 sc (2 sc in the chains, 7 in the stitches from previous row), 6 inc, 9 sc (33).
– Cut the yarn, leaving a long tail to hide later.
Pink Inner Ears (Make 2)
1. Ch 9. Work around the chain.
2. Starting from the 2nd ch from the hook: sl st, 3 sc, 3 hdc, 5 hdc in last ch.
3. On the other side: 3 hdc, 3 sc, sl st. (Switch to the main color here) (18)
4. Ch 3. Starting from the 2nd ch from the hook: 9 sc (2 sc in chains, 7 in stitches from previous row), 6 inc, 9 sc (33).
– Do not cut the yarn.
Joining the Ears
– Place one solid color ear and one pink-centered ear together with the right sides facing out.
– Ch 2, then crochet through both layers:
– Round 4: 13 sc, 4 hdc, 13 sc (30).
– Cut the yarn, leaving a long tail for sewing the ears onto the bunny’s head.
– Repeat for the second ear.
– Sew the ears onto the head between rounds 3-5.
Face Embroidery
1. Nose:
– Embroider two horizontal lines with pink thread between rounds 16-17, spanning 3 stitches.
– Pull the vertical line down 2 stitches.
2. Eyes:
– Place them 3 stitches away from each side of the nose.
– Make vertical lines 2 stitches high.
– Add a white highlight with one vertical stitch from the top of the eye to the center.
3. Eyelashes:
– Add one horizontal and one diagonal stitch at the top of the eyes.
4. Cheeks:
– Embroider two horizontal pink lines 2 stitches wide, 3 stitches apart from the lower part of the eyes.
Arms (Make 2)
Round 1: 6 sc in magic ring (6)
Round 2: (inc, 2 sc) repeat 2 times (8)
Rounds 3-11: 8 sc (9 rounds)
Flatten the arm and crochet across both layers to close: 4 sc
– Do not stuff the arms.
– Sew them onto the body between rounds 3-4 from the neck.
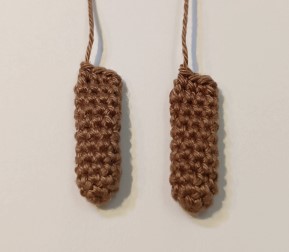
Legs (Make 2)
Round 1: 6 sc in magic ring (6)
Round 2: inc x6 (12)
Round 3: (inc, sc) repeat 6 times (18)
Rounds 4-6: 18 sc (3 rounds)
Round 7: 8 sc, dec, 8 sc (17)
Rounds 8-9: 17 sc (2 rounds)
Round 10: 7 sc, dec, 8 sc (16)
Round 11: 16 sc
Round 12: 3 sc, dec, 6 sc, dec, 3 sc (14)
Round 13: 14 sc
– Start stuffing the leg and continue to round 18.
– Do not stuff rounds 19-24.
Rounds 14-24: Gradually decrease to 9 sc and finish with a flattened close.
– Sew the legs to the body so they remain movable.

Headband
Ch 49.
Row 1: Starting from the 2nd ch from the hook: 48 sc. Ch 1, turn.
Row 2: 48 sc. Ch 1, turn.
Row 3: 48 sc.
– Cut the yarn, leaving a long tail for sewing.
Bow
1st row: Chain 29.
2nd row: Starting from the second chain from the hook, make 28 single crochets. Chain 1, turn.
3rd-5th row: 28 single crochets. Chain 1, turn. (For 3 rows)
6th row: 28 single crochets.
Cut the yarn, leaving a longer tail, and sew the two ends of the bow together.
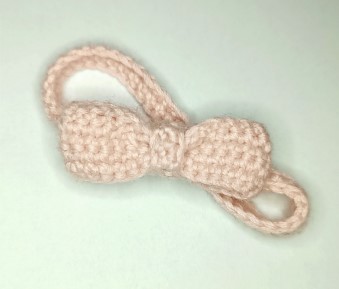
Bow Center
1st row: Chain 11.
2nd row: Starting from the second chain from the hook, make 10 single crochets. Chain 1, turn.
3rd row: 10 single crochets.
Cut the yarn, leaving a longer tail, and sew the two ends of the bow center together, attaching it around the middle of the bow.
Now sew the bow onto the headband where its two ends were joined. This will make the seam invisible.
Dress
Start with the underskirt:
Chain 39. Starting from the 2nd chain from the hook:
1st row: 38 single crochets. Chain 2, turn. (38)
2nd row: Work in the front loops only: 38 double crochet increases (76).
3rd-5th row: 76 double crochets (76).
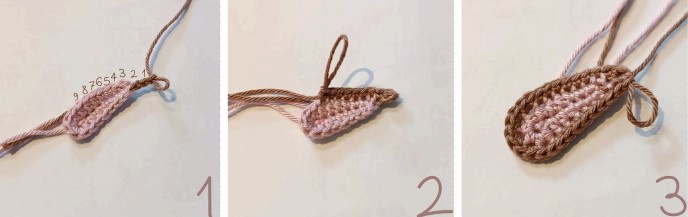
Cut the yarn, leaving a longer tail for sewing. 1st Image
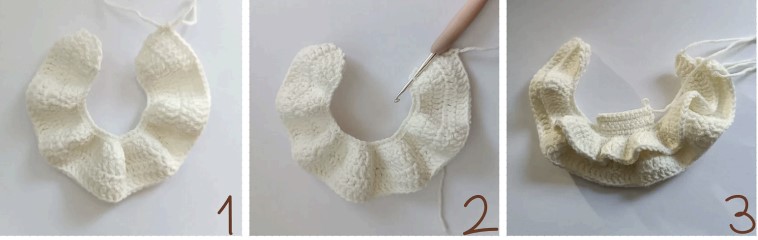
Top Skirt:
Attach the yarn to the first front loop of the 2nd row, as shown in 2nd image.
1st row: Chain 2, double crochet increase in the same stitch, double crochet increase in the remaining 37 front loops. (76) Chain 2, turn.
2nd row: (2 double crochets, double crochet increase) repeat 2 times5, 1 double crochet. (101)
Cut the yarn, leaving a longer tail for sewing.

For the top part of the dress, attach the yarn to the 14th chain from the left.
1st row: Chain 1, make 1 single crochet in the same stitch. Make 10 more single crochets. (11) Chain 1, turn.
2nd-4th row: 11 single crochets (11). Chain 1, turn.
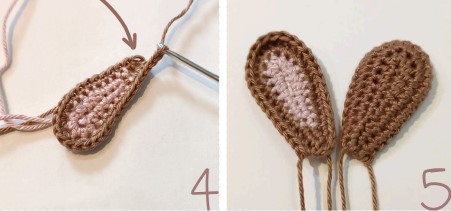
5th row: 11 single crochets (11). 3rd Image
Chain 12. This will be the right strap of the dress. 4th Image
Cut the yarn, leaving a longer tail for sewing.
For the left strap, attach the yarn to the first single crochet of the 5th row and chain 12. 5th Image
Cut the yarn, leaving a longer tail for sewing.

Sew the skirt pieces together at the back center. Weave in all remaining yarn ends except for the straps.
Secure the straps to the back of the skirt.
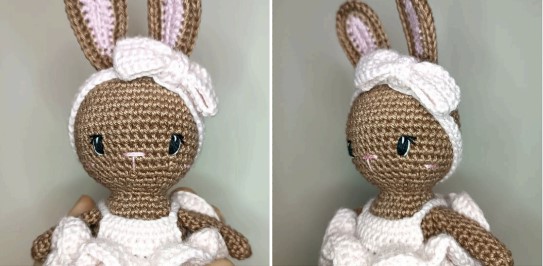
Congratulations, you’re done!
You may also like Amigurumi Turtle Free Pattern
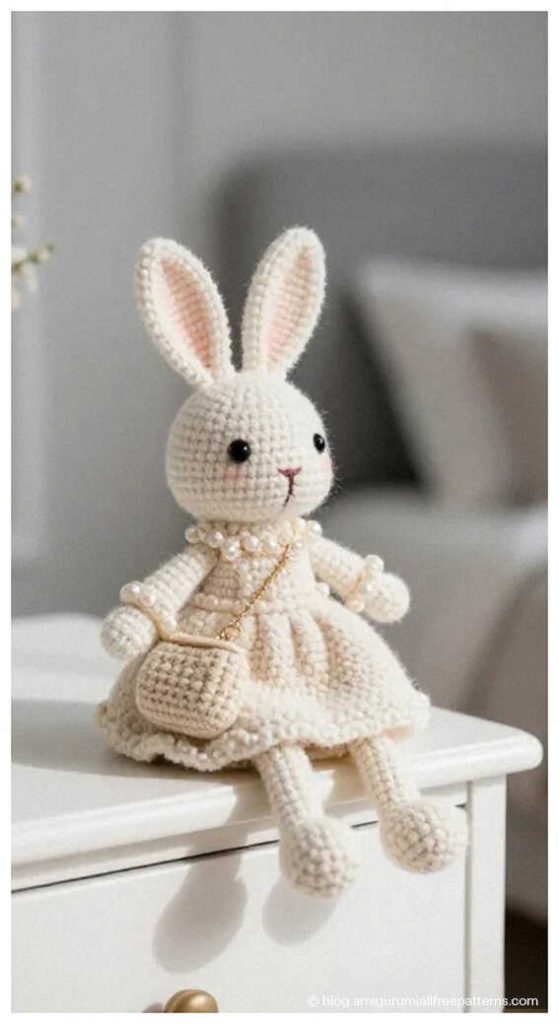
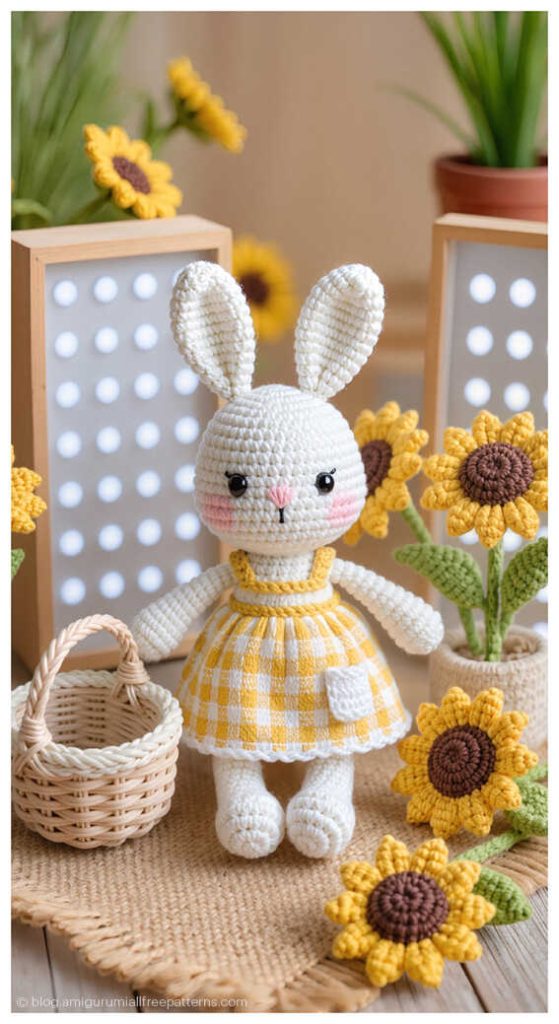
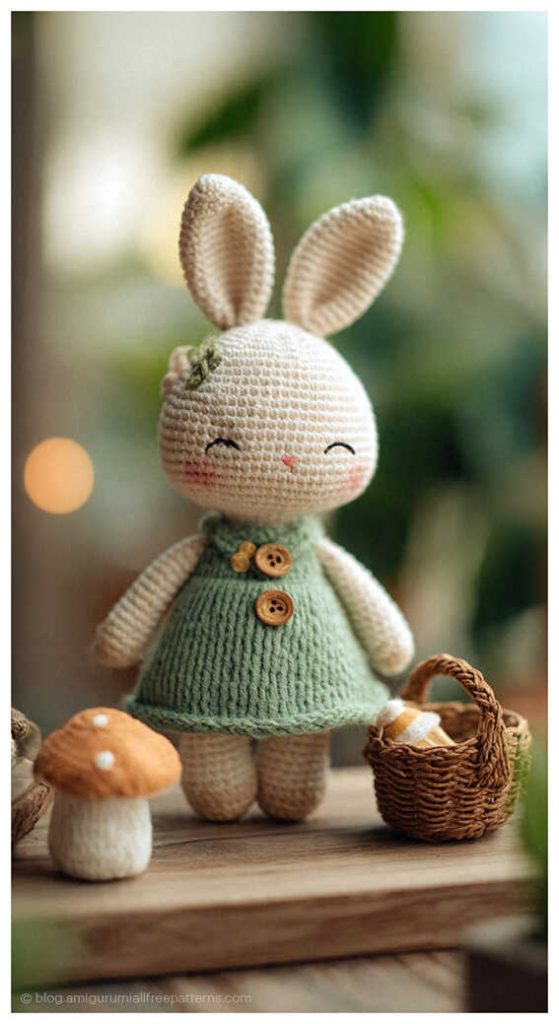
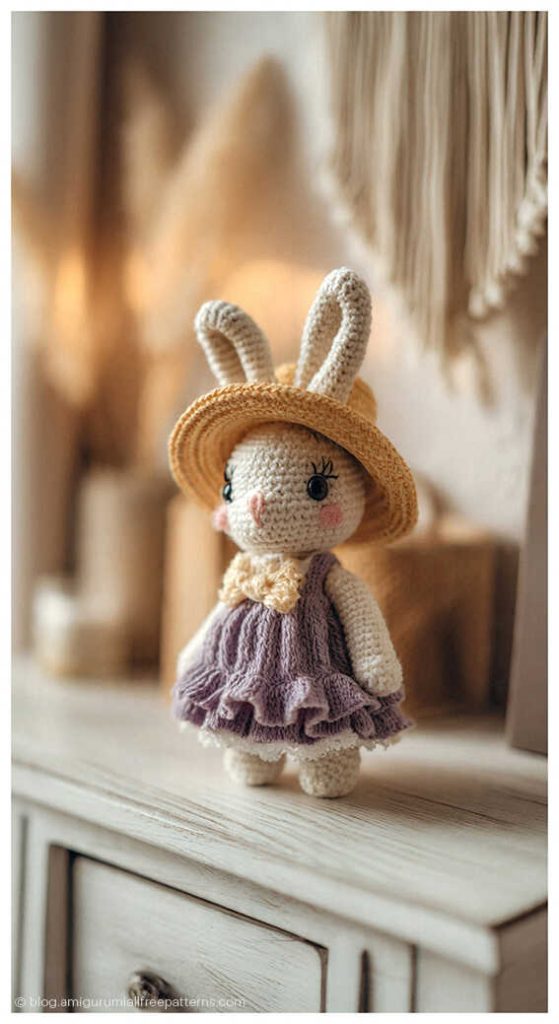
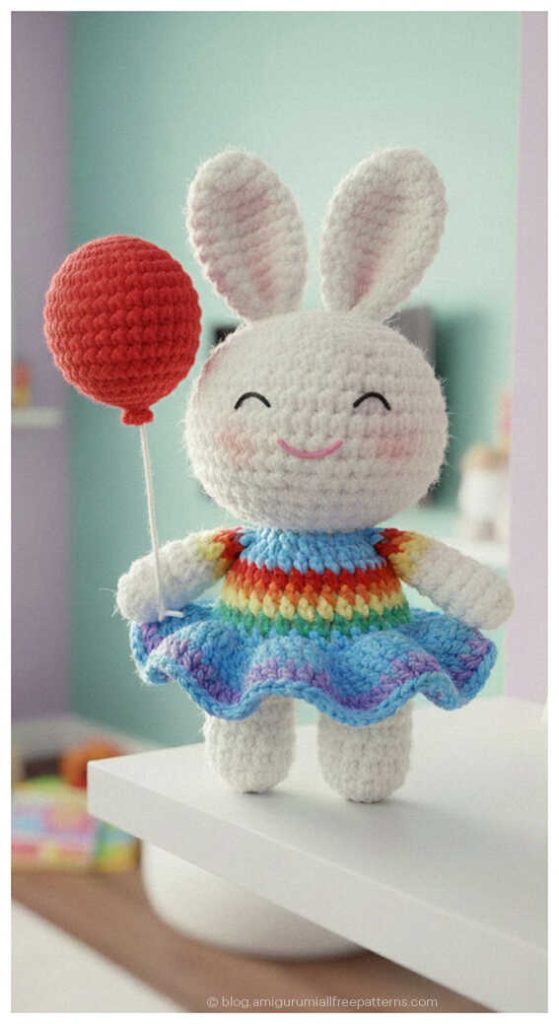
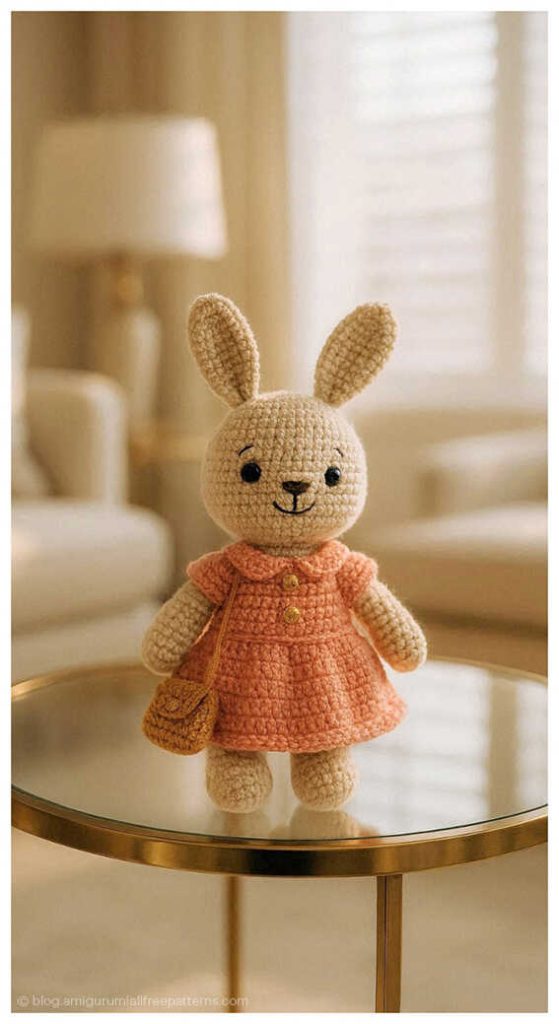
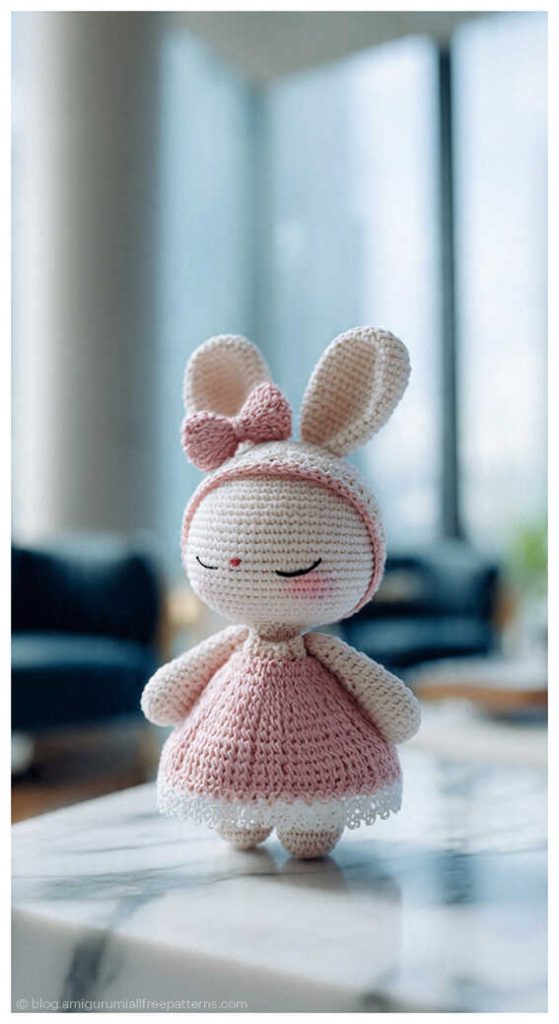
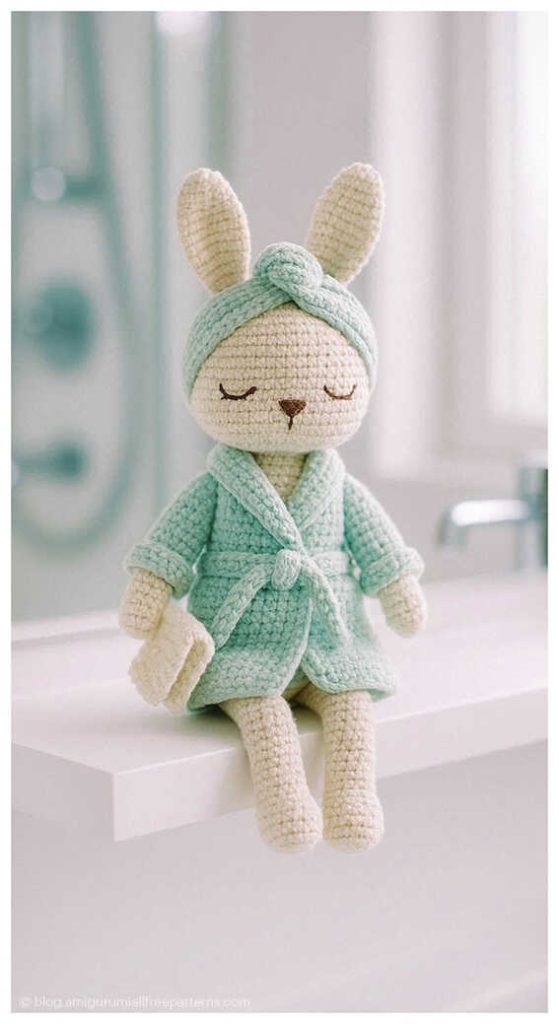
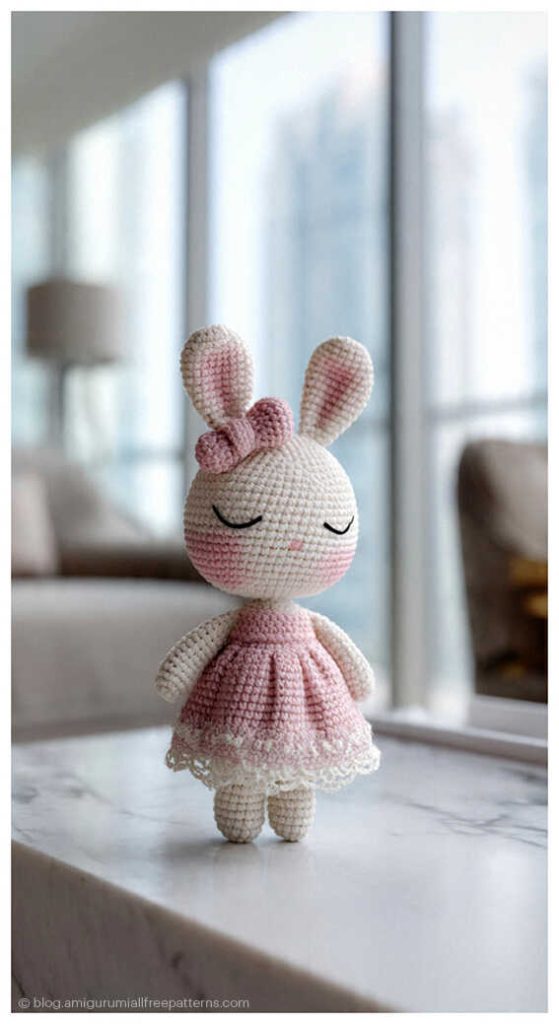
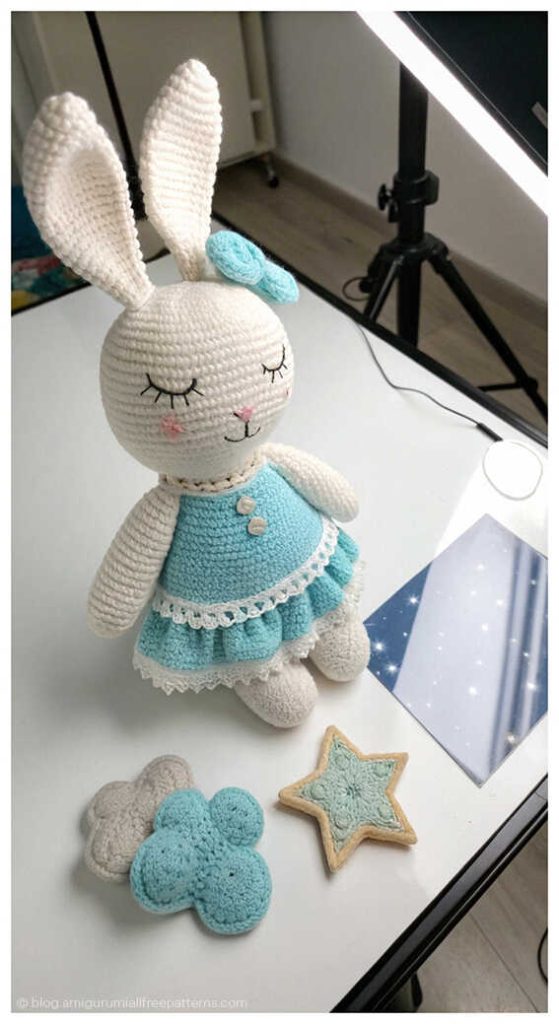
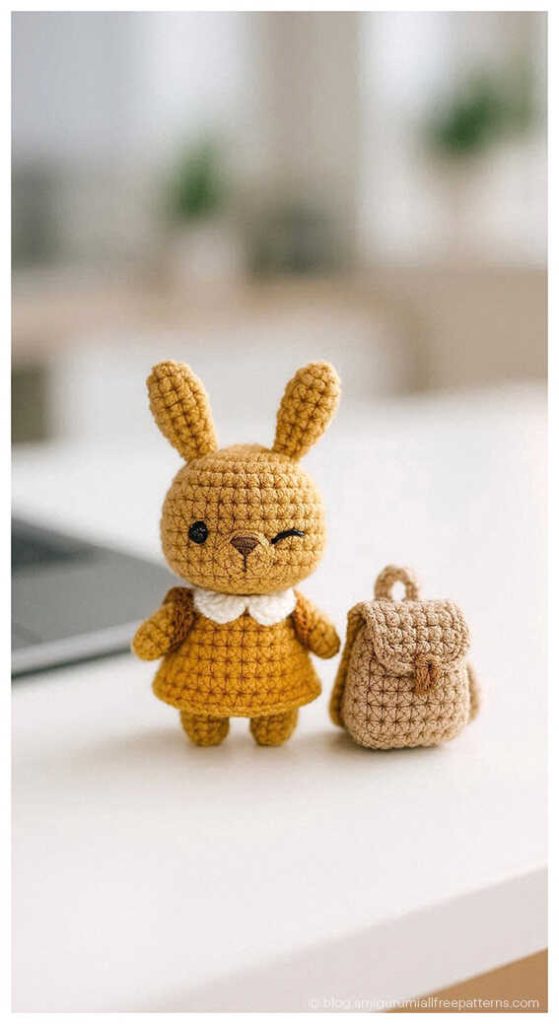
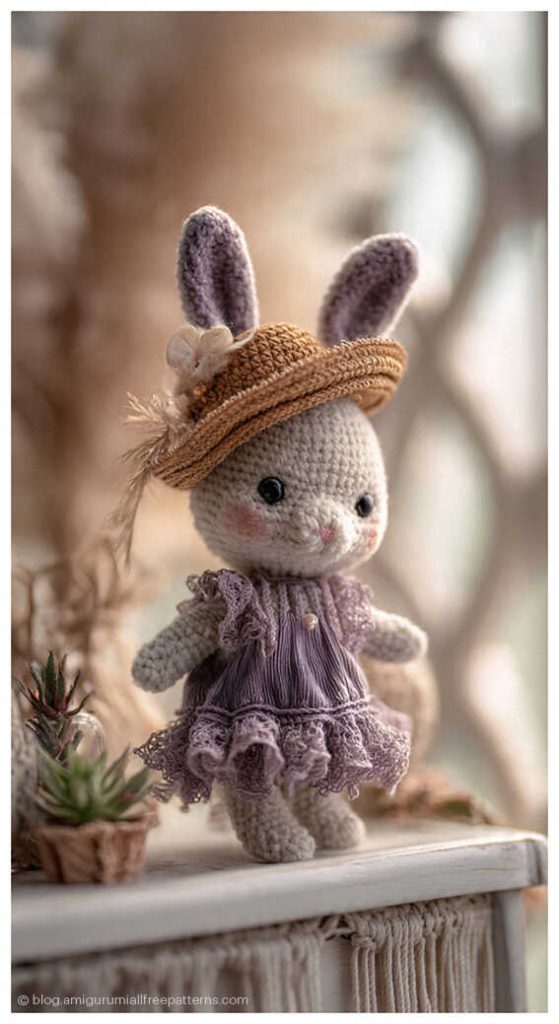
Favorite amigurumi bunny ideas:


After I initially commented I clicked the -Notify me when new feedback are added- checkbox and now each time a remark is added I get 4 emails with the identical comment. Is there any means you possibly can take away me from that service? Thanks!