Designer: owlonhook
Hi there...
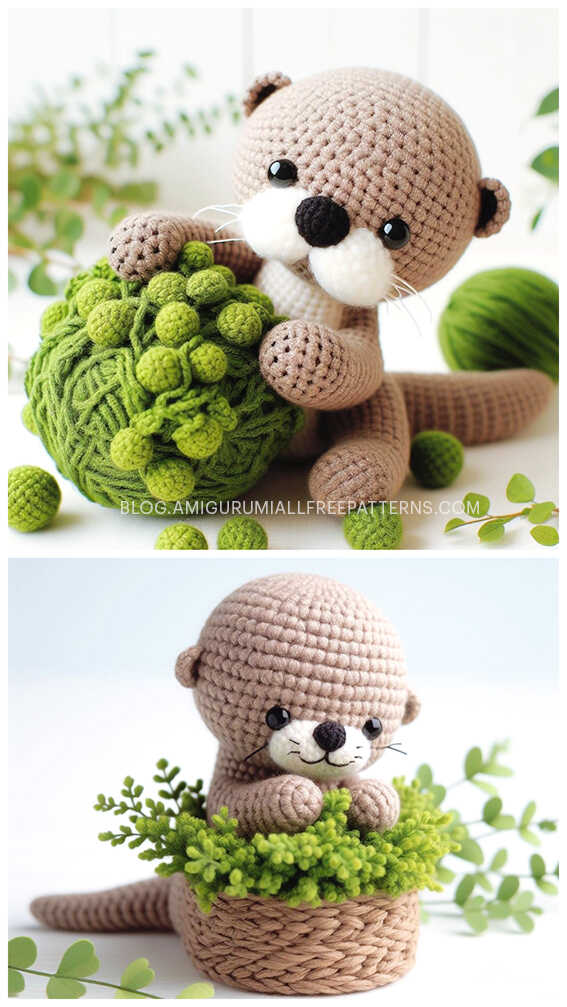
One of the free amigurumi crochet patterns we will share today is the amigurumi otter whose photos and design belong to owlonhook. You can learn how to crochet these otter using the free amigurumi pattern. Thanks to owlonhook for this cute little otter.

Amigurumi cats, amigurumi dolls, amigurumi dogs, amigurumi unicorns, amigurumi lambs, amigurumi dinosaurs, amigurumi foxes, amigurumi bears, amigurumi giraffes, amigurumi pigs, amigurumi penguins, amigurumi panda, amigurumi llama, amigurumi bunny, amigurumi clowns, amigurumi elephants, amigurumi hippos, amigurumi monkeys will not be difficult for you…
Materials
- Milk cotton yarn 4 ply
- 2.5 mm crochet hook
- 20 mm safety nose
- 10 mm safety eyes
- Embroidery thread
- Stitch marker
- Scissor
- Needle
- Fiberfill stuffing
Abbreviations
- mr = magic ring
- rnd = round
- sc = single crochet
- inc = increase (2 sc in each st)
- dec = decrease (2 sc together)
- sl st = slip stitch
- ch = chain
- rep = repeat
- bl = back loop
- fl = front loop
Finished Size; Approximately 9″ / 23 cm tall

NORMAN THE CHRISTMAS OTTER CROCHET FREE PATTERN
Head
Start with light brown yarn.
Rnd 1: Mr, sc 6. [6]
Rnd 2: Inc in all 6 st. [12]
Rnd 3: (Sc in next st, inc) x 6. [18]
Rnd 4: (Sc in next 2 st, inc) x 6. [24]
Rnd 5: (Sc in next 3 st, inc) x 6. [30]
Rnd 6: (Sc in next 4 st, inc) x 6. [36]
Rnd 7: (Sc in next 5 st, inc) x 6. [42]
Rnd 8: Sc in all 42 st. [42]
Rnd 9: (Sc in next 6 st, inc) x 6. [48]
Rnd 10-11: Sc in all 48 st. [48]
Rnd 12: (Sc in next 7 st, inc) x 6. [54]
Rnd 13-16: Sc in all 54 st. [54]
Change to off-white yarn.
Rnd 17-20: Sc in all 54 st. [54]
Rnd 21: (Sc in next 8 st, inc) x 6. [60]
Rnd 22-23: Sc in all 60 st. [60]
Attach safety eyes between rounds 16 and 17, leaving 9 stitches (count 8 holes) between them. Start stuffing the head with fiberfill stuffing as you continue.
Rnd 24: (Sc in next 8 st, dec) x 6. [54]
Rnd 25: (Sc in next 7 st, dec) x 6. [48]
Rnd 26: (Sc in next 6 st, dec) x 6. [42]
Rnd 27: (Sc in next 5 st, dec) x 6. [36]
Rnd 28: (Sc in next 4 st, dec) x 6. [30]
Rnd 29: (Sc in next 3 st, dec) x 6. [24]
Rnd 30: (Sc in next 2 st, dec) x 6. [18]
Rnd 31: (Sc in next st, dec) x 6. [12]
Rnd 32: (Dec) x 6. [6]
Stuff the head firmly with fiberfill stuffing.
Sl st in next st and fasten off. Leave a long yarn tail.
Thread the tail through a needle and weave the needle through the front loop of each of the 6 st. Pull the yarn tail to close the hole. Insert the needle through the middle of the hole and pull through the top.
Fasten off and weave the end in.
Snout
In off-white yarn.
Ch 4.
Rnd 1: In the 2nd ch from hook, sc in next 2 st. 3 sc in next st. Sc in next st. 2 sc in next st. [8]
Rnd 2: Inc in next st. Sc in next st. Inc in next 3 st. Sc in next st. Inc in next 2 st. [14]
Rnd 3: (Sc in next st, inc in next st). Sc in next st. (Sc in next st, inc in next st) x 3. Sc in next st. (Sc in next st, inc in next st) x 2. [20]
Rnd 4: (Sc in next 2 st, inc in next st). Sc in next st. (Sc in next 2 st, inc in next st) x 3. Sc in next st. (Sc in next 2 st, inc in next st) x 2. [26]
Rnd 5-6: Sc in all 26 st. [26]
Fasten off and leave a long yarn tail for sewing.
Attach safety nose in the middle of the snout between Rnd 2 & 3.
Mouth
Using black embroidery thread, sew a straight line downward from the center of the nose between rnd 1-3.
Stuff the snout firmly with fiberfill stuffing.
Sew the snout onto the head between Rnd 16-23.
Whiskers
Using black embroidery thread, embroider whiskers onto the side of the face.
Sew the top whisker on Rnd 19, 4 st apart.
Sew the bottom whiskers between Rnd 20-22, 7 st apart.
Ear (make 2)
In light brown yarn.
Rnd 1: Mr, sc 6. [6]
Rnd 2: Inc in all 6 st. [12]
Rnd 3-4: Sc in all 12 st. [12]
Do not stuff. Fasten off and leave a long yarn tail for sewing.
Sew the ears to the head between Rnd 13-17.
Hat
Start with white yarn.
Rnd 1: Mr, sc 6. [6]
Rnd 2: Inc in all 6 st. [12]
Rnd 3-4: Sc in all 12 st. [12]
Rnd 5: (Dec) x 6. [6]
Stuff firmly with fiberfill stuffing.
Change to red yarn.
Rnd 6: (Sc in next st, inc) x 3. [9]
Rnd 7: (Sc in next 2 st, inc) x 3. [12]
Rnd 8: Sc in all 12 st. [12]
Rnd 9: (Sc in next st, inc) x 6. [18]
Rnd 10: Sc in all 18 st. [18]
Rnd 11: (Sc in next 2 st, inc) x 6. [24]
Rnd 12: Sc in all 24 st. [24]
Rnd 13: (Sc in next 3 st, inc) x 6. [30]
Rnd 14: Sc in all 30 st. [30]
Change to white yarn.
Rnd 15: Sl st in next st. *Ch 1, sl st in next st. Rep * till the end.
Fasten off and leave a long yarn tail for sewing.
Stuff the hat gently with fiberfill stuffing to hold it in shape.
Position the hat on the head as you like and sew it on.
Body
Start with light brown yarn.
Rnd 1: Mr, sc 6. [6]
Rnd 2: Inc in all 6 st. [12]
Rnd 3: (Sc in next st, inc) x 6. [18]
Rnd 4: (Sc in next 2 st, inc) x 6. [24]
Rnd 5: (Sc in next 3 st, inc) x 6. [30]
Rnd 6: (Sc in next 4 st, inc) x 6. [36]
Rnd 7: (Sc in next 5 st, inc) x 6. [42]
Rnd 8: (Sc in next 6 st, inc) x 6. [48]
Rnd 9: (Sc in next 7 st, inc) x 6. [54]
Rnd 10-13: Sc in all 54 st. [54]
Change to white yarn.
Rnd 14: Sc in all 54 st. [54]
Change to green yarn.
Rnd 15 bl: Sc in all 54 st. [54]
Change to red yarn.
Rnd 16: Sc in all 54 st. [54]
Change to white yarn.
Rnd 17: Sc in all 54 st. [54]
Change to green yarn.
Rnd 18: Sc in all 54 st. [54]
Start stuffing the body with fiberfill stuffing as you continue.
Change to red yarn.
Rnd 19: (Sc in next 7 st, dec) x 6. [48]
Change to white yarn.
Rnd 20: Sc in all 48 st. [48]
Change to green yarn.
Rnd 21: Sc in all 48 st. [48]
Change to red yarn.
Rnd 22: (Sc in next 6 st, dec) x 6. [42]
Change to white yarn.
Rnd 23: Sc in all 42 st. [42]
Change to green yarn.
Rnd 24: Sc in all 42 st. [42]
Change to red yarn.
Rnd 25: (Sc in next 5 st, dec) x 6. [36]
Change to white yarn.
Rnd 26: Sc in all 36 st. [36]
Change to green yarn.
Rnd 27: Sc in all 36 st. [36]
Change to red yarn.
Rnd 28: (Sc in next 4 st, dec) x 6. [30]
Change to white yarn.
Rnd 29: Sc in all 30 st. [30]
Change to green yarn.
Rnd 30: Sc in all 30 st. [30]
Stuff the body firmly with fiberfill stuffing.
Fasten off and leave a long yarn tail for sewing.
Sew the body to the head.
Shirt Edging
In white yarn.
With the bottom of the body facing outward, join yarn to the fl of Rnd 15.
Rnd 1: *Ch 1, sl st in next st. Rep * till the end.
Leg (make 2)
In light brown yarn.
Rnd 1: Mr, sc 6 = [6]
Rnd 2: Inc in all 6 st. = [12]
Rnd 3: (Sc in next st, inc) x 6. [18]
Rnd 4-5: Sc in all 18 st. [18]
Fasten off and leave a long yarn tail for sewing.
Stuff the legs firmly with fiberfill stuffing.
Sew the legs to the body between Rnd 6-11.
Tail
In light brown yarn.
Rnd 1: Mr, sc 6 = [6]
Rnd 2: Sc in all 6 st. [6]
Rnd 3: (Sc in next 2 st, inc) x 2. [8]
Rnd 4: Sc in all 8 st. [8]
Rnd 5: (Sc in next 3 st, inc) x 2. [10]
Rnd 6-8: Sc in all 10 st. [10]
Stuff the tail firmly with fiberfill stuffing as you continue.
Rnd 9: (Sc in next 4 st, inc) x 2. [12]
Rnd 10-12: Sc in all 12 st. [12]
Rnd 13: (Sc in next 5 st, inc) x 2. [14]
Rnd 14-16: Sc in all 14 st. [14]
Rnd 17: (Sc in next 6 st, inc) x 2. [16]
Rnd 18-20: Sc in all 16 st. [16]
Rnd 21: (Sc in next 7 st, inc) x 2. [18]
Rnd 22-24: Sc in all 18 st. [18]
Fasten off and leave a long yarn tail for sewing.
Stuff the tail firmly with fiberfill stuffing.
Sew the tail to the back of the body between Rnd 9-13.
Hand (make 2)
Start with light brown yarn.
Rnd 1: Mr, sc 5 = [5]
Rnd 2: Inc in all 5 st. = [10]
Rnd 3-6: Sc in all 10 st. [10]
Change to white yarn.
Rnd 7: Sc in all 10 st. [10]
Change to green yarn.
Rnd 8: Sc in all 10 st. [10]
Change to red yarn.
Rnd 9: Sc in all 10 st. [10]
Change to white yarn.
Rnd 10: Sc in all 10 st. [10]
Change to green yarn.
Rnd 11: Sc in all 10 st. [10]
Change to red yarn.
Rnd 12: Sc in all 10 st. [10]
Change to white yarn.
Rnd 13: Sc in all 10 st. [10]
Change to green yarn.
Rnd 14: Sc in all 10 st. [10]
Change to red yarn.
Rnd 15: Sc in all 10 st. [10]
Change to white yarn.
Rnd 16: Flatten, sc both side together.
Do not stuff the hands.
Sew the hands to the side of the body between Rnd 22-27.
To close the hands in front, sew the tip of the hands together between Rnd 1 & 2.
Congratulations, you have completed the amigurumi christmas otter pattern.
Thank you for visiting our website blog.amigurumiallfreepatterns.com.
More amigurumi otter ideas: