Designer: Vivir Vintage
Instagram: @vivir_vintage
Hi there, amigurumi fans!..
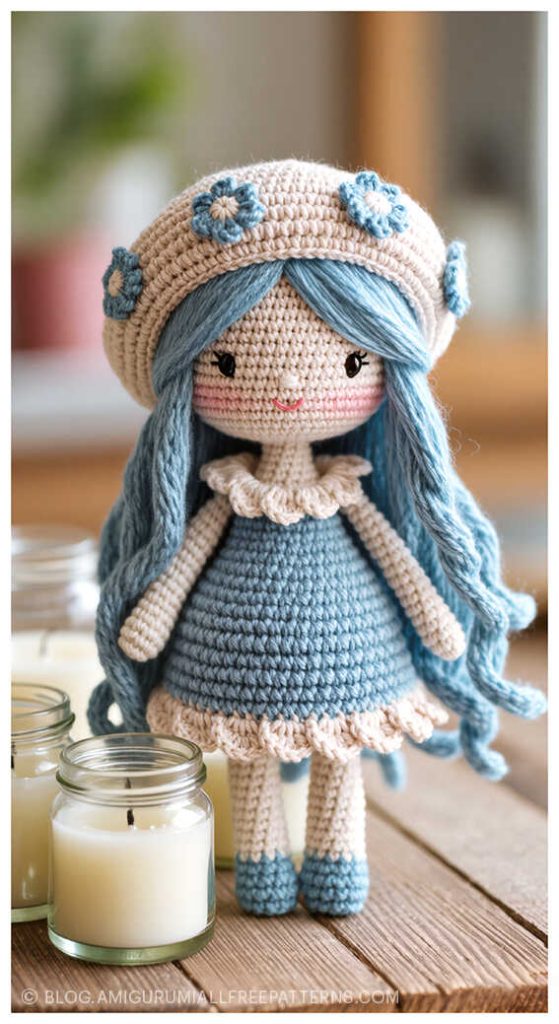
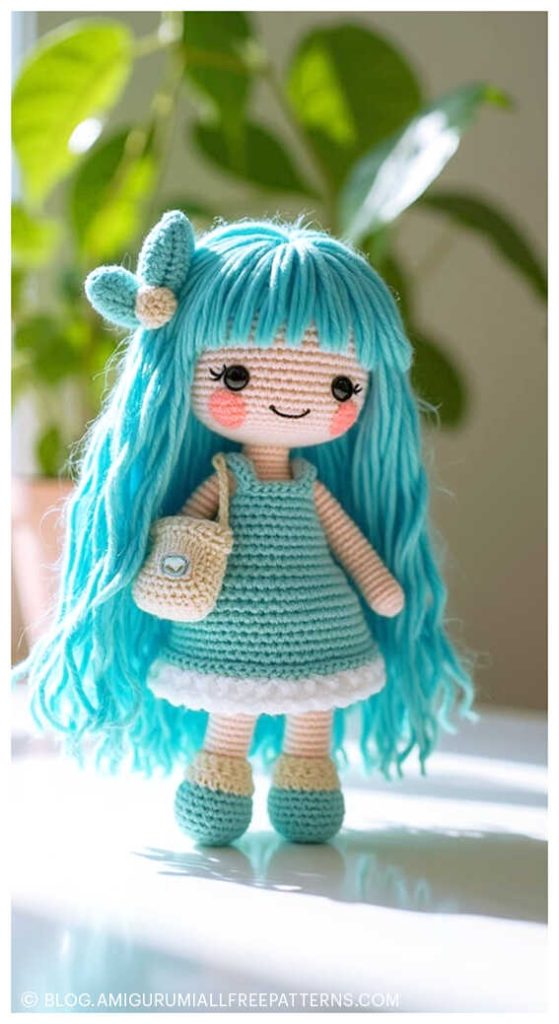
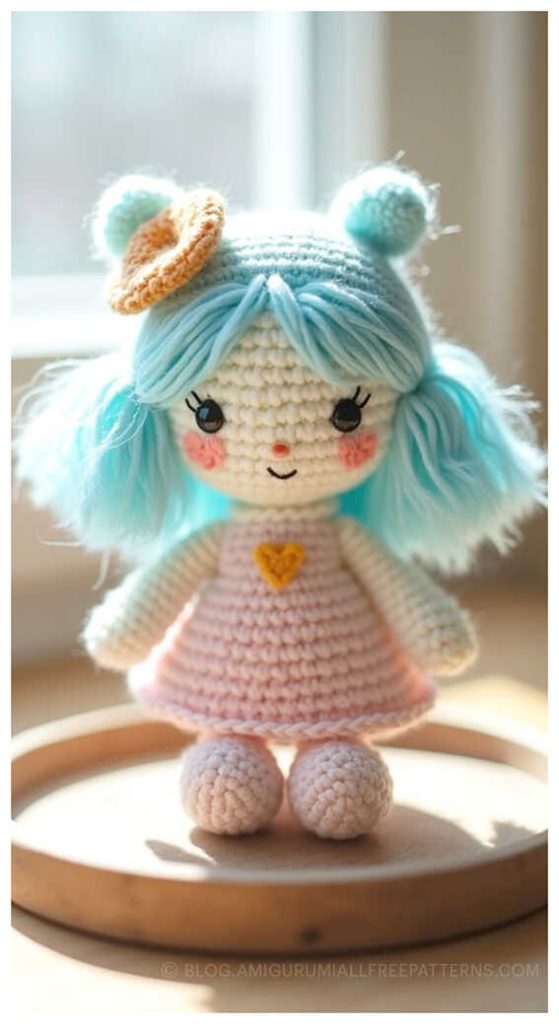
Discover the enchanting Amigurumi Dahlia Blue Doll Free Crochet Pattern designed by the talented Karla Kopaitich (Facebook). This adorable doll stands about 23 cm tall once finished and is perfect for crochet enthusiasts who love creating fairy-inspired characters. With her light blue hair, delicate white dress, and tiny wings, Dahlia looks like a magical fairy straight out of a storybook. The step-by-step instructions make this project easy to follow, even if you are just starting your crochet journey. All you need is cotton yarn, a 3.0 mm crochet hook, fiberfill stuffing, and a few basic tools like scissors, a tapestry needle, and safety eyes to bring this doll to life.
This pattern not only guides you through each stage with clear directions but also gives you the chance to add your own creative touch. Whether you use a pink fabric marker for gentle blush, or style Dahlia’s hair with a small brush, the result will be an irresistibly cute fairy doll. A big thank you goes to Karla Kopaitich for sharing this beautiful design with the crochet community. Once you finish this project, don’t forget to explore the inspiring collection of other amigurumi doll ideas that can spark your creativity even further. For a more detailed tutorial, you can always visit the designer’s Instagram page @vivir_vintage.
Materials:
Light pink cotton yarn.
White cotton yarn.
Pink cotton yarn.
Light blue cotton yarn.
Fiberfill stuffing.
Scissors.
Stitch marker.
3.0mm – 3.5mm crochet hook.
Tapestry needle.
10mm safety eyes.
Pink fabric marker.
Brush.
Glue gun stick.
Abbreviations:
MR- magic ring
sc- single crochet
inc- increase
dec- decrease
ch- chain
slst- slip stitch
dc- double crochet
hdc- half double crochet
AMIGURUMI DOLL FREE PATTERN
Legs:
Crochet one leg and then the other.
At the end, join them with chains and continue with the body.
Start from the foot towards the leg.
R1. 6 sc in MR (6)
R2. 6 inc (12)
R3. 1sc, 1 inc
Repeat this sequence 6 times (18)
R4. back loop only: 1sc, in each stitch (18)
R5-7. 1sc, in each stitch (18)
R8. 5sc, 4dec, 5 sc (14)
Change to light pink yarn.
R9. BLO: 5sc, 2 dec, 5sc (12)
R10-21. 1sc in each stitch (12)
Fasten off and hide thread make the other leg.
Stuff both legs with fiberfill stuffing.
Place 2 stitch markers on the inner center of each leg, leaving the dec’s from rounds 8 and 9 facing the front.
Change to white yarn.
R22. Hook the yarn to one of the stitch markers on leg 1.
Crochet 12 sc from leg 1.
Then chain 3 and start crocheting at the stitch marker on leg 2. Crochet 12 sc from leg 2.
Finish by making 1 sc in each of the 3 ch (30)
Now continue crocheting the body.
Body
In white cotton yarn.
R23-26. 1sc in each stitch (30)
R27. 3sc, 1dec, repeat this sequence 6 times (24)
R28. 6sc, 1dec, repeat this sequence 6 times (21)
R29. back loops only 1 sc in each stitch (21)
R30. 5sc, 1dec, repeat this sequence 3 times (18)
R31. 1sc in each stitch (18)
R32. 4sc, 1dec, repeat this sequence 3 times (15)
R33. 1sc in each stitch (15)
R34. 3sc, 1dec, repeat this sequence 3 times (12)
R35. 1sc in each stitch (12)
Change color to light pink yarn.
Stuff the body with fiberfill stuffing.
R36. back loop only: 1sc in each stitch (12)
R37-48. 1 sc in each stitch (12)
Insert a glue gun stick in the neck area, extending it down to the crochet.
R49. 6 dec (6)
Fasten off and hide thread.
Head
In light cotton yarn.
Start at the inner part where the neck will fit, and then continue with the head.
R1. 6 sc in MR (6)
R2. 6 inc (12)
R3-14. 1 sc in each stitch (12)
Finish the round with 1 slst. Chain 1. turn the work.
R5. back loop only: 12 inc (24)
R6. 3sc, 1 inc, repeat this sequence 6 times (30)
R7. 4sc, 1 inc, repeat this sequence 6 times (36)
R8. 5sc, 1 inc, repeat this sequence 6 times (42)
R9. 6sc, 1 inc, repeat this sequence 6 times (48)
R10-22. 1 sc in each stitch (48)
Place safety eyes between rounds 15 and 16, leaving 7 sc apart.
R23. 6sc, 1dec, repeat this sequence 6 times (42)
R24. 5sc, 1dec, repeat this sequence 6 times (36)
R25. 4sc, 1dec, repeat this sequence 6 times (30)
R26. 3sc, 1dec, repeat this sequence 6 times (24)
R27. 2sc, 1dec, repeat this sequence 6 times (18)
Stuff the head with silicone-coated stuffing.
R28. 1sc, 1dec, repeat this sequence 6 times (12)
R29. 6 dec (6)
Fasten off and hide thread.
Wig
With light blue cotton yarn.
R1. 6 sc in MR (6)
R2. 6 inc (12)
R3. 1sc, 1 inc, repeat this sequence 6 times (18)
R4. 2sc, 1 inc, repeat this sequence 6 times (24)
R5. 3sc, 1 inc, repeat this sequence 6 times (30)
R6. 4sc, 1 inc, repeat this sequence 6 times (36)
R7. 5sc, 1 inc, repeat this sequence 6 times (42)
R8. 6sc, 1 inc, repeat this sequence 6 times (48)
R9-13. 1 sc in each stitch (48)
In the next round, we will crochet the bangs.
R14. Crochet 16 sc. In the next 16 sc, we will make short rows to form the doll’s bangs. In each stitch, crochet: sc, ch5. Starting from the third ch, go back by crocheting 4sc.
Move to the next stitch: sc, ch 5, go back with 4sc. After finishing the 16 short rows, complete the round with 16sc.
Fasten off and leave a tail for sewing.
Braids (X3)
With light blue cotton yarn.
Crochet 1 braid to place around the wig’s edge and 2 braids to roll up and use on the sides of the wig.
R1. 3sc in MR (3)
Chain 1 and turn the workk.
R2. Crochet 1 sc in the first stitch.
Continue with a chain of 61 stitches.
Starting from the third chain, go back by crocheting 60 sc.
Crochet 1 sc in the second stitch.
Continue with a chain of 61 stitches.
Starting from the third chain, go back by crocheting 60 sc.
Crochet 1 sc in the third stitch.
Continue with a chain of 61 stitches.
Starting from the third chain, go back by crocheting 60 sc.
Fasten off and leave a tail for sewing.
Arms (X2)
With light pink cotton yarn.
R1. 8 sc in MR (8)
R2-4. 1 sc in each stitch (8)
Fasten off and hide thread.
Change to white cotton yarn.
R5. BLO: 8 inc (16)
R6-9. 1 sc in each stitch (16)
R10. 2sc, 1dec repeat this sequence 4 times (12)
R11-12. 1 sc in each stitch (12)
R13. 1 sc, 1 dec, repeat this sequence 4 times (8)
R14-15. 1 sc in each stitch (8)
Stuff lightly with fiberfill stuffing.
R16. 2sc, 1dec, repeat this sequence 2 times (6)
Fasten off and leave tail for sewing.
Skirt
With white cotton yarn.
Hook the yarn to the center back of the body, working on the front loops of round 29.
I recommended crocheting loosely and, if necessary, switching to a 3.5mm crochet hook.
R29. front loop only: crochet 4 sc on each front loop.
R30-37. 1sc in each stitch from the previous round.
R38. crochet 1 sc in the first stitch, in the second stitch insert the hook 3 rounds below and make an sc. Crochet 1 sc in the third stitch. In the fourth stitch, insert the hook 3 rounds below and make an sc.
Repeat the same sequence throughout the round.
R39. In the first stitch, insert the hook 3 rounds below and make an sc. In the second stitch, make an sc through the back loop. In the third stitch, insert the hook 3 rounds below and make an sc.
In the fourth stitch, make an sc through the back loop.
Repeat the same sequence throughout the round.
Fasten off and hide thread.
Shoe sole (X2)
With light blue cotton yarn.
R1. 6 sc in MR (6)
R2. 6 inc (12)
R3. 1 sc, 1 inc, repeat this sequence 6 times (18)
Fasten off and leave a tail for sewing.
Ears (X2)
With light pink cotton yarn.
We will crochet the ears directly onto the head.
Position the head with the eyes facing upward.
Insert the hook where the ear would be placed, picking up 2 rounds of the head, and join with a chain.
Turn the work and in the space created, crochet: sc, 3 hdc, sc.
Fasten off and leave a tail for sewing.
Repeat the same thing on the other side.
Assembly
1. Position the wig on the head, leaving 0.5cm of space between the eyes and the bangs.
Additionally, the wig should almost touch the ears. Secure the position with pins.
Sew the wig onto the head.
2. Make 3 braids. Sew one of them to the front of the wig. The braid will run from the back of one ear to the other.
3. Roll up the remaining 2 braids. Make a few stitches to secure them in place.
Sew them behind the ears, between the wig and the head.
4. Sew the arms to the sides of the body, aligning them with round 34 of the body.
5. Sew the soles to the bottom of the legs, working through the back loop of round 4.
6. With white cotton yarn, embroider the eye highlights. This means creating a half-circle out-line around the safety eyes.
7. With light pink cotton yarn, embroider the nose.
8. Use a pink fabric marker and a brush to paint the cheeks and the top of the nose.
9. Sew a crocheted flower onto the front of one of the braids.
Crochet Dolls You’ll Love


Craft Your Own Amigurumi Wonderland
Step into a world of handmade charm with step-by-step tutorials for every amigurumi animal – from adorable amigurumi cats, amigurumi dogs, and amigurumi bunnies to magical amigurumi unicorns, gentle amigurumi elephants, and towering amigurumi giraffes. Explore patterns for amigurumi bears, amigurumi foxes, amigurumi pandas, amigurumi monkeys, amigurumi lambs, amigurumi pigs, amigurumi birds, amigurumi penguins, amigurumi llamas, amigurumi hippos, amigurumi dinosaurs, and whimsical amigurumi dolls and amigurumi clowns.
Each pattern includes clear instructions and inspiring images, perfect for beginners and experienced crocheters. Don’t miss out on the latest amigurumi creations – stay connected with us at blog.amigurumiallfreepatterns.com, join our Facebook page and Facebook group, and bring these delightful toys to life stitch by stitch!
Keywords: free amigurumi patterns, crochet toys, amigurumi animals, beginner-friendly crochet, amigurumi dolls, DIY crochet patterns