Designer: @letim_toys
Hi there…
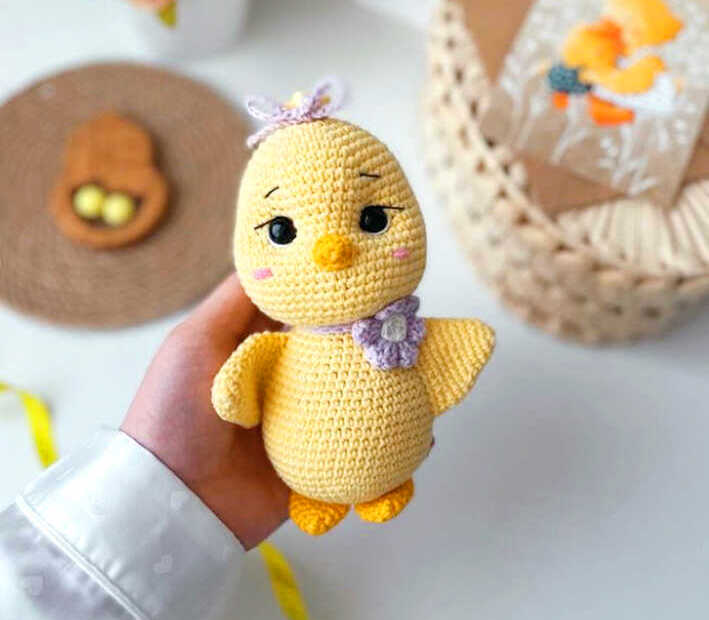
One of the free amigurumi crochet patterns we will share today is the amigurumi chick whose photos and design belong to Lesya Konovalova. You can learn how to crochet these chick using the free amigurumi pattern. Thanks to Lesya Konovalova for this cute chick.
Amigurumi cats, amigurumi dolls, amigurumi dogs, amigurumi unicorns, amigurumi lambs, amigurumi dinosaurs, amigurumi foxes, amigurumi bears, amigurumi giraffes, amigurumi pigs, amigurumi penguins, amigurumi panda, amigurumi llama, amigurumi bunny, amigurumi clowns, amigurumi elephants, amigurumi hippos, amigurumi monkeys will not be difficult for you…
Don’t forget to visit our YouTube channel .…
Materials:
*YarnArt Jeans yarn (55% cotton, 45% acrylic, 50 g/160 m), colors:
#88 – for a body, wings and tuft of hair (less than one skein)
#35 – for a beak and feet
#19 – for a flower, strip and bow
#03 – for a center of a flower
pink for cheeks
white for eye whites
*2.0 mm crochet hook
*12 mm safety eyes
*Black embroidery floss or YarnArt Iris yarn for eyebrows and lashes
*Tapestry needle
*Scissors
*Stitch marker
*Fiberfill
Abbreviations:
R = row
mc = magic circle
ch = chain
sl st = slip stitch
sc = single crochet
dc = double crochet
hdc = half double crochet
inc = increase (2 sc in the next stitch)
dec = decrease (single crochet 2 stitches together)
dec3 = single crochet 3 stitches together
(12) = number of stitches you should have at the end of the round/row
(…)*6 = repeat whatever is between the brackets the number of times stated
F.o. = finish off
The finished size of the amigurumi chick is about 17 cm (6.7″) tall.
FREE AMIGURUMI SPRING CHICK CROCHET PATTERN
Head
R 1: 6 sc in mc (6)
R 2: (inc)*6 (12)
R 3: (1 sc, inc)*6 (18)
R 4: (2 sc, inc)*6 (24)
R 5: (3 sc, inc)*6 (30)
R 6: (4 sc, inc)*6 (36)
R 7: (5 sc, inc)*6 (42)
R 8: (6 sc, inc)*6 (48)
R 9-14: 48 sc (6 rows)
R 15: (5 sc, inc)*8 (56)
R 16: (13 sc, inc)*4 (60)
R 17-22: 60 sc (6 rows)
Insert safety eyes between R 14 and R 15 at the distance of 8 st from each other.
R 23: (13 sc, dec)*4 (56)
R 24: (5 sc, dec)*8 (48)
R 25: (4 sc, dec)*8 (40)
Stuff with fiberfill.
R 26: (3 sc, dec)*8 (32)
R 27: (2 sc, dec)*8 (24)
R 28: (2 sc, dec)*6 (18)
R 29: (1 sc, dec)*6 (12)
Finish stuffing.
R 30: (dec)*6 (6)
F.o.
Body
R 1: 6 sc in mc (6)
R 2: (inc)*6 (12)
R 3: (1 sc, inc)*6 (18)
R 4: (2 sc, inc)*6 (24)
R 5: (3 sc, inc)*6 (30)
R 6: (4 sc, inc)*6 (36)
R 7: (5 sc, inc)*6 (42)
R 8: (6 sc, inc)*6 (48)
R 9: (7 sc, inc)*6 (54)
R 10-11: 54 sc (2 rows)
R 12: inc, 3 hdc in one st, inc, 51 sc (58)
R 13: 3 sc, 3 hdc in one st, 54 sc (60)
R 14: 4 sc, 3 hdc in one st, 55 sc (62)
R 15: dec, 3 sc, 1 hdc, 3 sc, dec, 51 sc (60)
R 16: dec, 2 sc, 1 hdc, 2 sc, dec, 51 sc (58)
R 17: 2 sc, dec3, 53 sc (56)
R 18: (5 sc, dec)*8 (48)
R 19-20: 48 sc (2 rows)
R 21: (6 sc, dec)*6 (42)
R 22: 42 sc
R 23: (5 sc, dec)*6 (36)
R 24: 36 sc
R 25: (4 sc, dec)*6 (30)
R 26: 30 sc
R 27: (3 sc, dec)*6 (24)
Stuff with fiberfill.
Thank you for visiting our website blog.amigurumiallfreepatterns.com.
Work some sc more to move a stitch marker in the middle of the body.
F.o. and leave a long tail for sewing.

Wings (make 2)
R 1: 6 sc in mc (6)
R 2: (inc)*6 (12)
R 3: 12 sc
R 4: (3 sc, inc)*3 (15)
R 5: 15 sc
R 6: (4 sc, inc)*3 (18)
R 7: (2 sc, inc)*6 (24)
R 8-9: 24 sc (2 rows)
R 10: (6 sc, dec)*3 (21)
Fold top of wing flat and 10 sc through both sides across.
F.o. and leave a long tail for sewing.
Feet (make 2)
With orange yarn:
R 1: 7 sc in mc (7)
R 2: 7 sc
R 3: (inc)*7 (14)
R 4-6: 14 sc (3 rows)
Fold top of foot flat and 5-6 sc through both sides across.
F.o. and leave a long tail for sewing.
Beak
With orange yarn:
R 1: 6 sc in mc (6)
R 2: (1 sc, inc)*3 (9)
F.o. and leave a long tail for sewing.
Assembly
Make eye tightening.
Embroider eye whites with white yarn, eyebrows and lashes with black floss.
Thank you for visiting our website blog.amigurumiallfreepatterns.com.
Sew the beak to the head between R 15 and R 18 and weave any remaining yarn into the head.
Embroider cheeks on the face between R 18 and R 19 (3 stitches with pink yarn in 2 sc long).
Tuft of hair
Attach the main color yarn to the head in front between R 2 and R 3.
Make 4 ch, from the 2nd chain from hook: 3 inc, sl st in the next st of the head.
Make 5 ch, from the 2nd chain from hook: 4 inc, sl st in the next st of the head.
Make 4 ch, from the 2nd chain from hook: 3 inc.
F.o.
Sew the head to the body through the stitches of the head between R 27 and R 28 of the head. Stuff firmly the neck area before you finish.
Sew the wings to the body slightly tilted between R 14 and R 25 with about 12 sc in between them.
Sew the feet next to each other in the middle of the magic circle.
Flower
With milk yarn:
6 sc in mc, change to purple yarn: sl st in the 1st st, 2 ch, 3 dc, 2 ch, sl st in the 1st st.
In the next st: sl st, 2 ch, 3 dc, 2 ch, sl st.
So make 6 petals.
Center of a flower
With milk yarn:
6 sc in mc, sl st in the 1st st.
F.o. and leave a long tail for sewing.
Sew the center of a flower to the flower.
Don’t cut the yarn tail.
Neckband
With purple yarn:
Make 70 ch or 75-80 ch.
From the 2nd ch from hook: sl st in every st to the end of the chain.
F.o.
Sew the flower to the strip with remaining yarn tail.
Bow
With purle yarn:
Make 70 ch.
F.o.
Tie the bow on the tuft.
Congratulations, you have completed the cute chick pattern.
Thank you for visiting our website blog.amigurumiallfreepatterns.com.
More amigurumi chick ideas:


This chick amigurumi pattern is absolutely adorable! I love how detailed the materials list is—especially the color breakdown for each part, which makes it so much easier to plan. Thanks for sharing such a well-structured pattern; I can’t wait to give it a try!
The chick design is so cute! I’m curious—do you think it would work with a thicker yarn to make a larger version of the chick? I might try experimenting with that.